Django Volt PRO
Premium Starter Django coded on top Volt PRO Bootstrap 5 design (Premium Version).
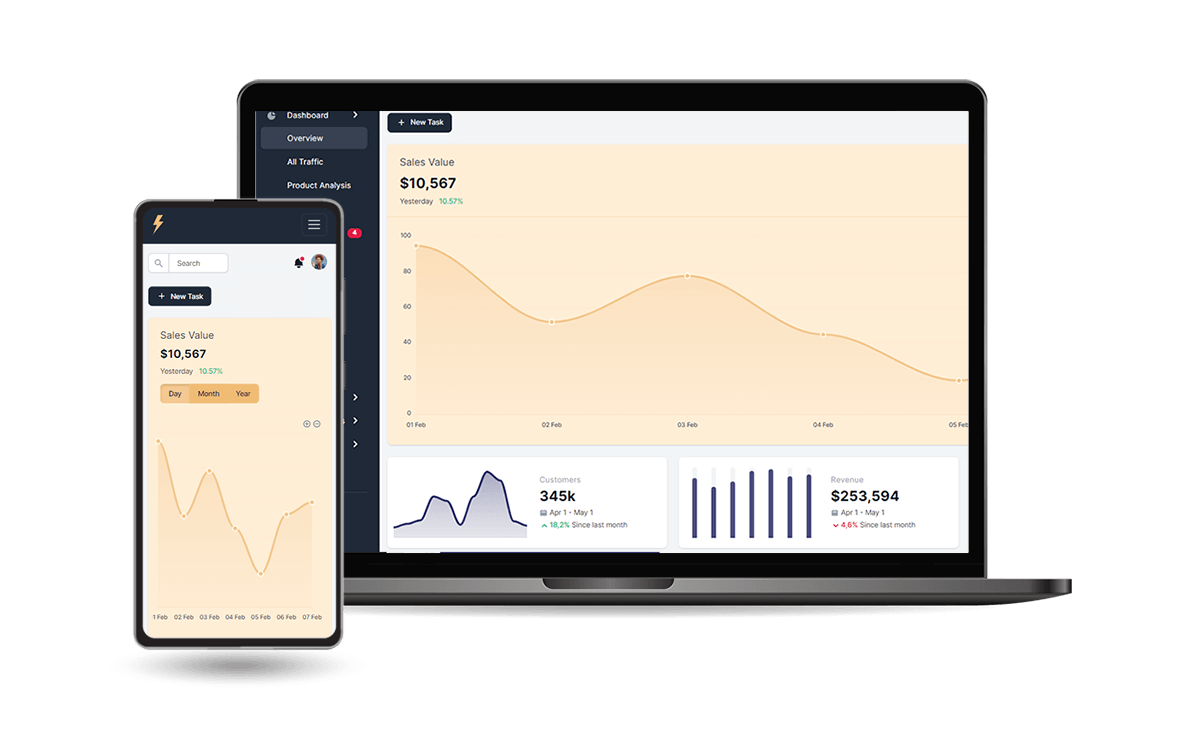
Django Admin Dashboard generated by the AppSeed platform on top of Volt PRO Dashboard Design (premium version) crafted by Themesberg.
Version: v1.0.8 - release date
2022-06-13
SQLite Database, Django Native ORM
Session-Based Authentication, Forms validation
Deployment scripts: Docker, Gunicorn/Nginx
Links
👉 Volt Dashboard PRO Django - Product page
👉 Volt Dashboard PRO Django - LIVE Demo
👉 Support (Email and LIVE on Discord) for
registered users.
✨ Environment
To use the starter, Python3 should be installed properly in the workstation. If you are not sure if Python is installed, please open a terminal and type python --version. Here is the full list with dependencies and tools required to build the app:
Python3 - the programming language used to code the app
GIT - used to clone the source code from the Github repository
Basic development tools (g++ compiler, python development libraries ..etc) used by Python to compile the app dependencies in your environment.
(Optional)
Docker- a popular virtualization software
\
✨ Start the app in Docker
👉 Step 1 - Download the code and unzip the sources (requires a
purchase).
👉 Step 2 - Start the APP in
Docker
Visit http://localhost:5085 in your browser. The app should be up & running.
\
✨ Manual Build
Download the code and unzip the sources (requires a
purchase).
\
👉 Set Up for Unix, MacOS
Unix, MacOSInstall modules via
VENV
Set Up Database
Start the app
At this point, the app runs at http://127.0.0.1:8000/.
\
👉 Set Up for Windows
WindowsInstall modules via
VENV(windows)
Set Up Database
Start the app
At this point, the app runs at http://127.0.0.1:8000/.
\
✨ Manage App Users
UsersBy default, the starter is not provided with users. To access the private pages and the admin section (reserved for superusers) follow up the next sections.
👉 Create Superusers
SuperusersTo access the admin section, Django requires superuser privilegies. Let's create a new superuser and access the admin section of the project:
Once the superuser is successfully created, we can access the admin section:
http://localhost:8000/admin/ (make sure you have a / at the end).
\
👉 Create (Ordinary) Users
By default, the app redirects guest users to authenticate. In order to access the private pages, follow this set up:
Start the app via
python manage.py runserverAccess the
registrationpage and create a new user:http://127.0.0.1:8000/register/
Access the
sign inpage and authenticatehttp://127.0.0.1:8000/login/
\
✨ Codebase structure
The project is coded using a simple and intuitive structure presented below:
\
✨ Application Bootstrap Flow
The entry point of the project is the core.settings.py file where the project configuration is bundled. The most important files that make the project functional are listed below:
manage.py(saved in the root of the project) loadscore/settings.pycore/settings.py:Loads the
.envfile (dynamic configuration)Loads the project routing:
core.urls.py
Defines the
templatesdirectoryapps/templates
Defines the
INSTALLED_APPSsectionapps.home- custom app that serve all pages
If the
DB_ENGINEvariable is not present in the environmentSQLitepersistence is used
If the
DB_ENGINEis presentThe DB URI is built dynamically for
MySqlorPostgreSQL.
\
✨ Project Routing
The core file that bundles together all routing rules is core/urls.py.
The home application being a generic router that serves all pages defined in the templates/home directory, should be the last rule defined in the urlpatterns.
NOTE: all new apps, should be included above
apps.home.urlsgeneric rule.
\
✨ UI Assets and Templates
The project comes with a modern UI fully migrated and usable with Django Template Engine.
👉 Page Templates
All pages and components are saved inside the apps/templates directory. Here are the standard directories:
templates/layouts: UI masterpagestemplates/includes: UI components (used across multiple pages)templates/accounts: login & registration pagetemplates/home: all other pages served via a generic routing byapps/homeapp
\
👉 Static Assets
The static assets used by the project (JS, CSS, images) are saved inside the apps/static/assets folder. This path can be customized with ease via ASSETS_ROOT variable saved in the .env file.
How it works
.envdefines theASSETS_ROOTvariablecore/settings.pyread the value ofASSETS_ROOTand defaults to/static/assetsif not found:
All pages and components use the
ASSETS_ROOTvariable. Here is a sample extracted fromtemplates/layouts/base.html:
At runtime, the href property is resolved to /static/assets/css/style.css based on the value saved in the .env file:
\
✨ Default Apps
The codebase comes with two simple apps that handle the authentication and serve all pages saved in the apps/templates/home directory.
👉 Authentication App
This default app defined in apps/authentication handles the authentication routes login, register. The most important files that make the authentication usable, are listed below:
forms.py- defines the Login, Registration formsviews.py- implements the login, registration flowroutes.py- map routing rules over the viewsmodels.py- EMPTY fileThe extended user model is NOT provided
👉 Home App
This app returns all pages saved in the templates/home directory to authenticated users. In case a page is not found, a generic page is returned using a 404 HTTP error status.
\
✨ Customisation
👉 Set up the MySql Database
Note: Make sure your Mysql server is properly installed and accessible.
Step 1 - Create the MySql Database to be used by the app
Create a new MySqldatabaseCreate a new userand assign full privilegies (read/write)
Step 2 - Install
mysqlclientpackage
Step 3 - Edit the
.envto match your MySql DB credentials. Make sureDB_ENGINEis set tomysql.
DB_ENGINE:mysqlDB_NAME: default value =appseed_dbDB_HOST: default value =localhostDB_PORT: default value =3306DB_USERNAME: default value =appseed_db_usrDB_PASS: default value =pass
\
Here is a sample:
At this point, the app should use MySql for the persistence layer.
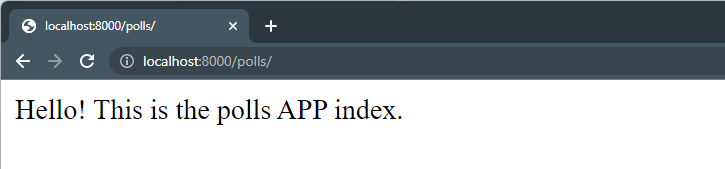
👉 Adding a new app
The existing codebase can be extended with ease with new apps and features. Here are the steps that create a new application named polls.
Create a new app using
startappcommand (make sure you are in the root of the project)
Write a simple view for the new app - Edit
polls/views.py
Create urls.py inside the
pollsdirectory
Update project routing -
core/urls.pyfile:
Enable the new app - Update
core/settings.pyfile:
Start the project and access the project in the browser:
http://localhost:8000/polls/
\
👉 Static Assets for production
productionAs explained in the Static Assets section, the assets are managed via:
apps/static/assets- the folder whereJS,CSS, andimagesfiles are savedASSETS_ROOT- environment variable, that defaults to/static/assetsif not defined
In production, the contents of the apps/static/assets files should be copied to an external (public) directory and the ASSETS_ROOT environment variable updated accordingly.
For instance, if the static files are copied to https://cdn.your-server.com/volt-pro-assets, the .env file should be updated as below:
🚀 Where to go from here
👉 Access the support page in case something is missing
👉 Use Volt Dashboard Generator to generate a new project
Last updated